Where to Find Scheduled Posts on LinkedIn: Profile or Page
Published on
Tags:
You scheduled a LinkedIn post, closed the tab, and came back to check the copy before it goes live. Now you're opening menus and wondering whether it saved, whether your colleague scheduled it somewhere else, or whether you should recreate it.
Don't recreate it yet. Finding where to find scheduled posts on LinkedIn starts with identifying the publishing account, not searching for a universal calendar. Treat the missing post as a lookup problem: confirm the identity, check your permissions, inspect the shared queue, and then verify the intended time.
Table of Contents
Which Queue Holds Your Scheduled Post
The easy mix-up is opening your personal publishing interface while looking for a company announcement. Your LinkedIn login might let you publish as yourself and administer a Page, but those are different publishing contexts.
For a personal profile, start from the homepage composer. For a Page, start inside the Page's administrative view. LinkedIn's Page scheduling documentation identifies super admins and content admins as the eligible roles and confirms that they can manage posts scheduled by other Page admins.
Where scheduled posts live for each account type
Account type | Where to start | Who can see the queue | Scheduling window |
Personal profile | Homepage Start a post, then the clock icon in Create a post | The profile owner | Check the available dates in the profile's scheduling dialog |
LinkedIn Page | Page admin view, then Page posts, then Start a post | Super admins and content admins, including posts by other Page admins | One hour to three months ahead, based on the admin's location, according to LinkedIn's Page guidance |
The personal-profile row deliberately doesn't borrow the Page scheduling window. Use the dates offered by the profile's own scheduling control rather than assuming every LinkedIn publishing surface has identical rules.
Choose your route before opening the composer:
Posting as yourself? Use the homepage path and look for the clock inside Create a post.
Posting as a Page? Enter that specific Page's admin view.
Working on a Page without an eligible role? Ask a super admin or content admin to inspect the queue.
Looking for a colleague's scheduled announcement? Treat it as shared Page content, not a private queue attached only to that colleague.
Practical rule: An empty list proves only that you haven't found the post in the publishing context you opened.
If switching between identities is becoming an operational burden, Data Hunters Agency's data-driven social media scheduler comparison is a useful starting point for evaluating alternative workflows. Compare account visibility and publishing records, not just calendar appearance.
Find your row before clicking anything. Choosing the wrong entry point makes a correctly scheduled post look absent.
Find Scheduled Posts on a Personal Profile
A personal-profile scheduled post is found through the composer, not a standalone LinkedIn dashboard. LinkedIn's personal scheduling help places the queue behind the homepage post box, the clock control and View all scheduled posts.
That route is easy to miss when you only want to inspect a post. You still have to open the composer first, then use its scheduling control to reach the existing queue.
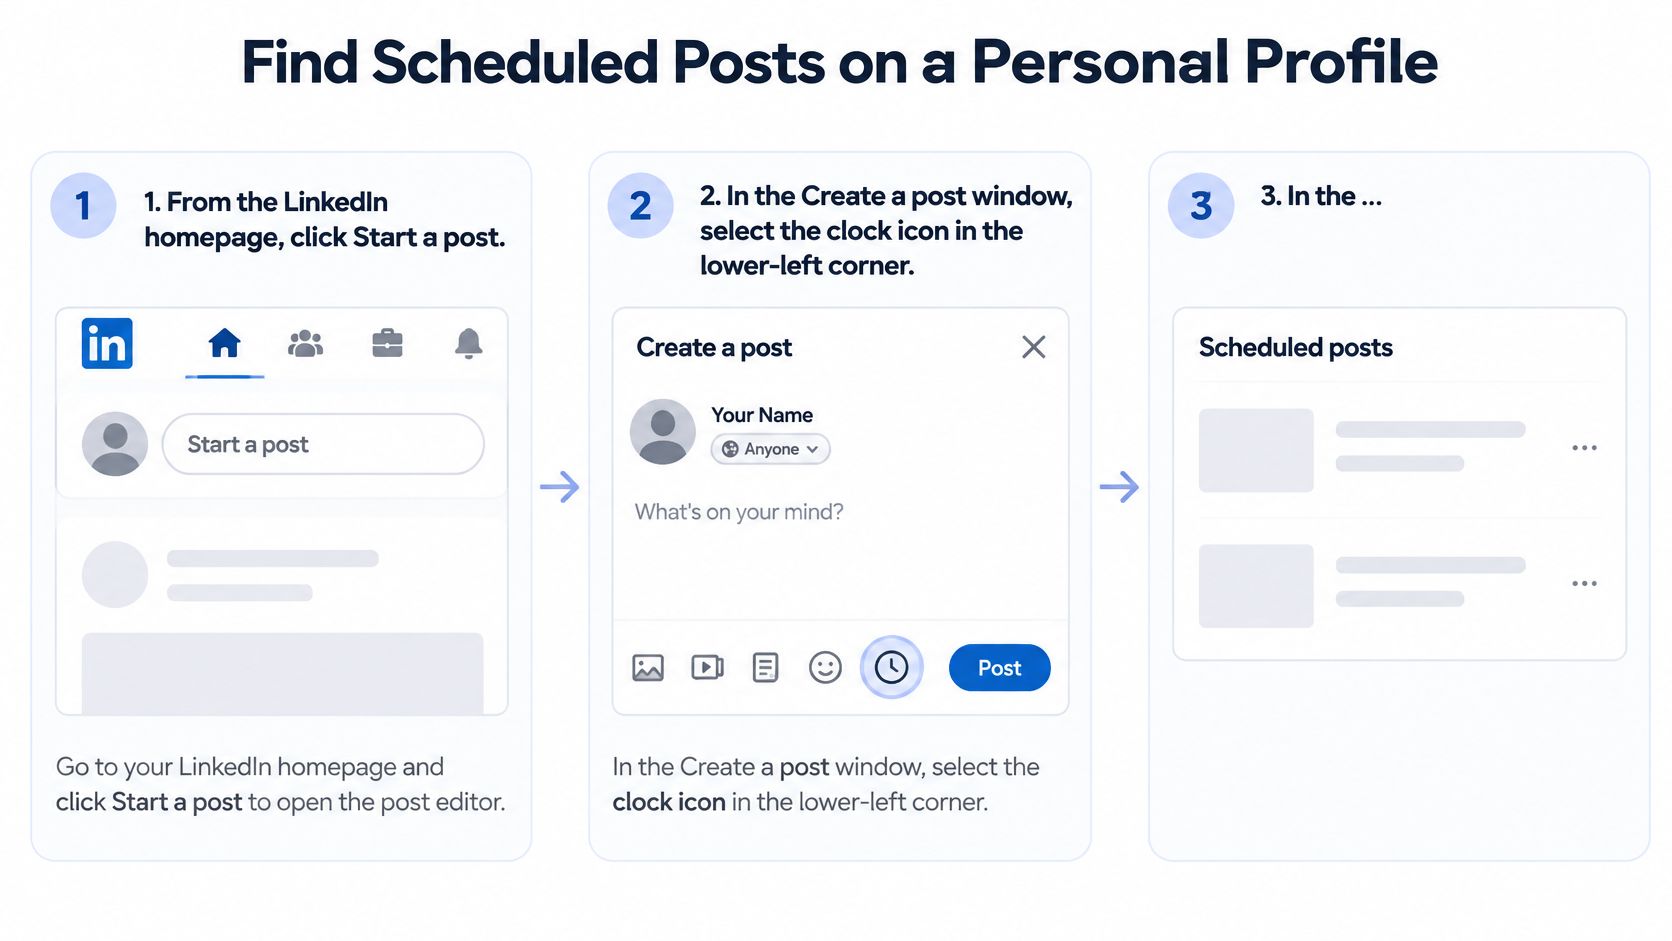 A three-step infographic showing how to find and view scheduled LinkedIn posts on a personal profile.
Follow the desktop path
From the LinkedIn homepage, click Start a post.
In the Create a post window, select the clock icon in the lower-left corner.
In the Schedule post dialog, choose View all scheduled posts.
Review the previews on the Scheduled posts page.
The list shows the posts scheduled for that profile. Find the matching preview, then inspect its scheduled date and time before deciding whether anything needs changing.
Check the content as well as the timestamp. Two versions can share a similar opening line, especially when a revised announcement was queued shortly after the original.
Confirm the identity before changing anything
Before treating the post as missing, confirm that it was intended for your personal profile. A company announcement written by you is still Page content if the company was selected as the publishing identity.
Keep the inspection separate from composing a replacement. If you need the broader creation workflow rather than queue access, use our guide to publishing on LinkedIn. Confirming the account first prevents an unnecessary second submission of the same announcement.
For a video walkthrough, use the embedded player below.
The steps above follow the desktop web layout. If you scheduled from the mobile app, check the clock or scheduling control in the app itself rather than assuming it sits in the same position as on desktop.
Before relying on the mobile result, verify the item in the desktop Scheduled posts list. Once you find it, note the displayed date and time so any edit is based on the actual queued post.
Why a Scheduled Post Seems to Have Disappeared
A post that looks missing may be sitting in another queue rather than deleted. Start with that possibility instead of treating an empty screen as evidence that LinkedIn lost the content.
LinkedIn's profile scheduling instructions place personal scheduled posts behind the composer's clock control. That's an important distinction when you're moving between a personal identity and Page administration.
Missing or wrong-time scheduled posts cause and first check
Symptom | Likely cause | Check first |
Post missing from personal list | Created on a Page, not on your profile | Open the Page admin view and check Page posts |
Post missing from Page list | Scheduled by another Page admin, or on a personal profile | Ask an eligible admin to check, then check your personal list |
Time looks off by hours | Time follows the scheduler's location | Compare the time with the scheduler's time zone |
Date refused or missing | Outside the permitted Page scheduling window | Pick a time inside the available window |
These are diagnostic starting points, not proof of what happened. In particular, another admin creating a Page post doesn't make it invisible to eligible admins. If a colleague scheduled it, their identity helps establish who can confirm the original action and intended timing.
Run the lookup in order. Open your personal scheduled list first and inspect the matching preview. If it isn't there, enter the intended Page's admin view, select Page posts, and inspect its scheduled list.
Next, verify the role you hold on that Page. Ask an eligible admin to inspect the shared queue and confirm whether a colleague changed the item's schedule or content. Don't interpret missing administrative controls as a missing post.
Recreating content is a publishing decision, not a troubleshooting shortcut.
Compare the intended time with the saved time
Ask the scheduler which location and time zone they used, then compare that with the intended audience time. Say a colleague scheduled an announcement while travelling: the useful question is which local time they selected, not which day everyone remembers approving.
For a Page, also check that the requested date was available in the scheduling dialog when the item was created. An intended date in a planning document isn't confirmation that LinkedIn accepted that date.
Only after checking the account, admin access, shared queue, location, and available scheduling window should you consider recreating anything. Otherwise, you risk adding a replacement while the original is still waiting to publish.
Find and Manage Scheduled Page Posts
A Page queue belongs to the Page's administration workflow. Start there rather than opening the ordinary homepage composer and hoping the company's content will appear.
LinkedIn's Page scheduling walkthrough documents the eligible admin roles and the route through Page posts. Use the following sequence while you're acting as the intended Page.
Open the Page's scheduled list
Open the Page's admin view as a super admin or content admin.
Select Page posts in the left menu.
Click Start a post.
Open the scheduling control and choose View all scheduled posts.
The infographic keeps the Page-specific entry point visible throughout the workflow.
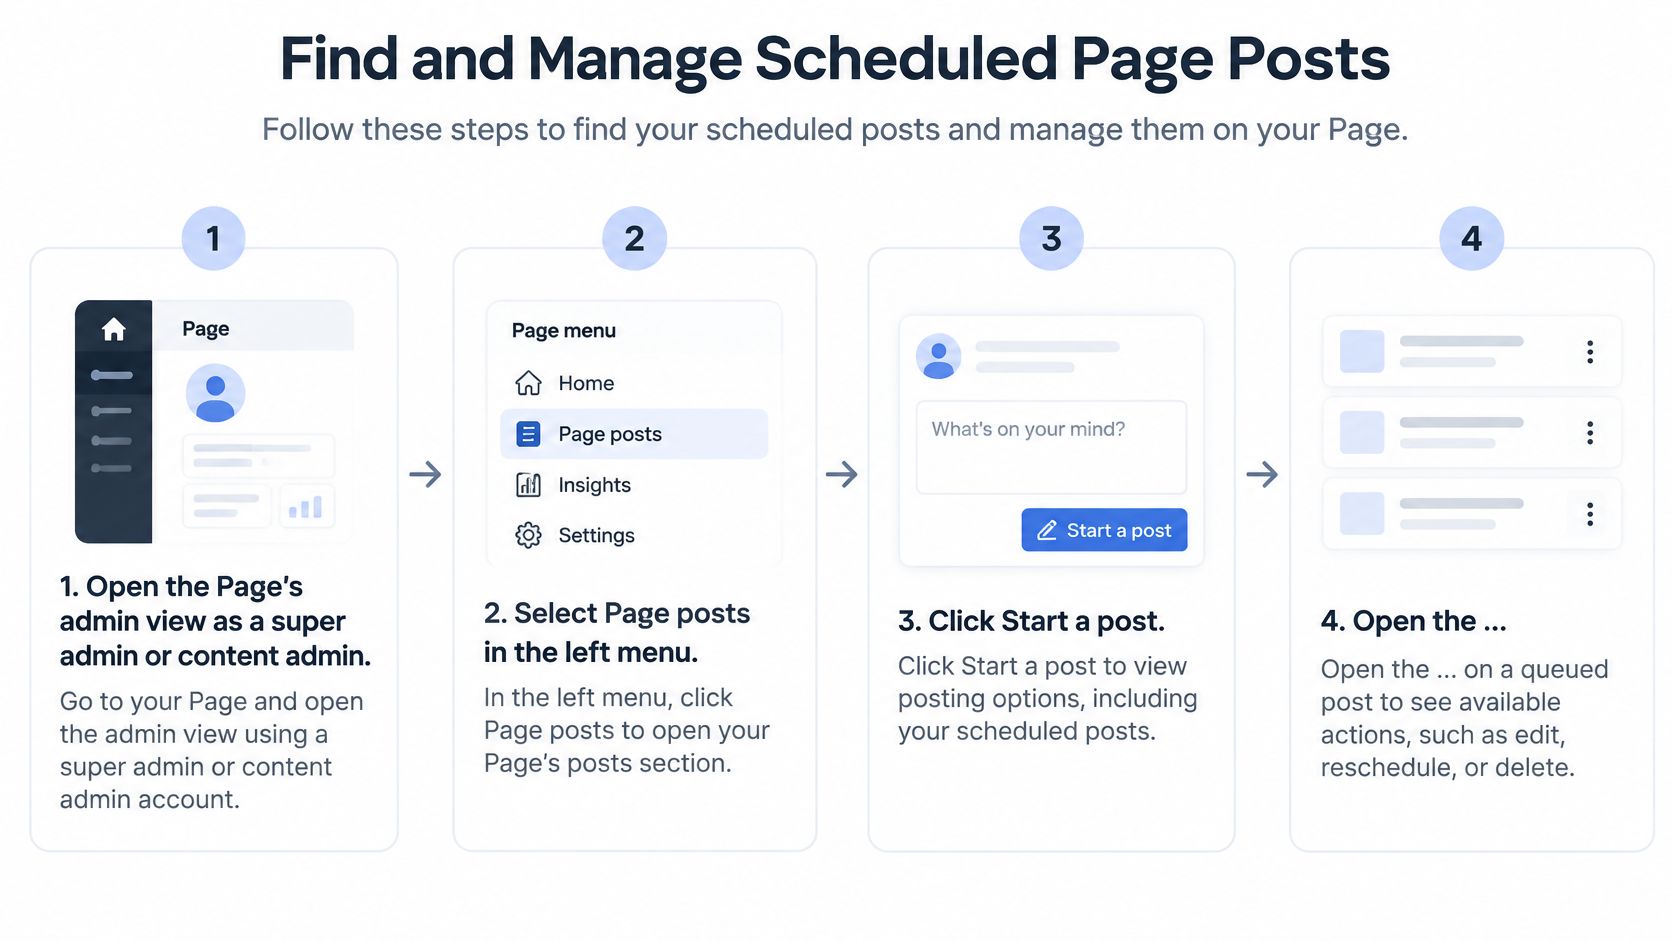 A four-step infographic explaining how to find and manage scheduled LinkedIn page posts as an admin.
For Page scheduling, the selected time follows the administrator's location. LinkedIn also supports entering an exact time rather than restricting you to the 30-minute dropdown increments, according to its scheduled Page posts guidance.
That distinction matters when an announcement has a precise release time. Don't round the publishing time merely because the dropdown offers convenient intervals. Enter the intended time, then verify the saved schedule before leaving the queue.
Choose the action that matches the problem
The scheduled list supports these controls:
Post now: Publish the queued item immediately.
Edit post: Change the post's text.
Modify schedule: Change its publication date or time.
Delete post: Remove the queued item.
These controls solve different problems. A typo calls for a content change; an incorrect release time calls for a schedule change. Deleting and rebuilding an otherwise correct Page post adds unnecessary work and makes it harder to track which version the team approved.
Eligible admins can also manage posts scheduled by other Page admins. Treat the list as a shared administrative queue, and coordinate before changing a colleague's announcement. Access to the control doesn't tell you whether the campaign owner has approved the change.
Separate permissions from publishing setup
Someone who follows or belongs to the Page isn't necessarily a super admin or content admin. If you can't reach the documented controls, establish your role before spending time searching for another menu.
For teams maintaining several brand channels, keep each platform's setup instructions separate. Clipatra's guide to publish your brand's first Facebook post is a useful companion for Facebook onboarding, but don't transfer its navigation assumptions to LinkedIn.
For developer-oriented LinkedIn publishing context, keep our LinkedIn integration overview alongside your operational notes. Native Page administration and an application's publishing workflow should be documented as distinct paths.
Confirm your role, open the intended Page's list, and act on the specific item you need. There's no reason to rebuild the surrounding queue to fix a single announcement.
Check the Right Queue Before You Schedule Again
A reliable scheduling workflow includes a read-back after creation. Clicking the final scheduling button records your intent; inspecting the resulting item confirms that you're looking at the content and destination you meant to use.
LinkedIn's scheduled Page posts documentation sets the Page window at one hour to three months in advance, with times based on the administrator's location. Apply that rule to native Page scheduling, not as an assumed restriction on every external publishing system.
Run a pre-publication check
Confirm the publishing identity. Write down whether the post targets your personal profile or a named Page. A content calendar entry that says only LinkedIn leaves the destination ambiguous.
Verify Page access. If you're using the native Page workflow, establish that you hold the super admin or content admin role before handing someone a scheduled-publication task.
Record the scheduler's time zone. Convert the intended audience time into the time zone used during scheduling. Keep both the intended local time and the conversion in the handoff note.
Check the Page's available date range. Use the scheduling dialog to confirm that the intended publication time is selectable. Don't treat a date written in an approval document as an accepted schedule.
Read back the queued item. Open the matching scheduled list after scheduling and inspect the content, target identity, and saved time. Resolve discrepancies while the approved copy is still readily available.
Record the publication result. Once the post publishes, save its publication date, time, LinkedIn identity, and public link. That gives the next person evidence of what went live.
The read-back is the step I wouldn't skip. It catches a wrong destination or misunderstood time before anyone has to investigate an announcement that appeared on the wrong account.
Handoff check: Could a colleague identify the destination and intended publication time without asking you what you meant?
Keep a small audit record
For each post, retain who scheduled it, the target identity, the intended time zone, the scheduled timestamp, and the final publication result. Include the platform's post ID when available, so similarly worded announcements don't become indistinguishable in your records.
For an automated workflow, our LinkedIn API guide for developers provides the integration context. In our publishing workflow, scheduled times are stored in UTC. Post details show a status for each connected account and, for each post, the platform's post ID and public link, or the error message if publishing failed.
That separates intended timing from the publication result. A scheduled timestamp answers when you wanted something to happen; a platform ID, public link, or error explains the outcome you need to investigate.
If your campaign also includes premieres, Premierely's guide to automate your premiere bookings is useful companion reading for organising that separate workflow. Keep the LinkedIn destination and schedule explicit rather than assuming a campaign-wide time means the same thing in every interface.
Bookmark the scheduled list you use most, and run this checklist on your next queued post before its publication time matters.
PostPulse offers scheduling and post management for LinkedIn personal profiles, with publication details that help you distinguish a planned post from a successful publication or a failed attempt. Visit PostPulse to build that verification into your app or automation instead of relying on someone to remember which queue they used.
About the Author
Founder of PostPulse — a social media scheduling platform for creators and teams. Software engineer with a passion for building developer tools and simplifying complex API integrations across social media platforms.