n8n Integration Guide
Learn how to use the official PostPulse n8n node for automated social media publishing workflows.
Overview
The PostPulse n8n node provides a visual, no-code way to integrate social media publishing into your automation workflows. Perfect for content creators, marketers, and agencies who want to automate their posting process.
🎯 Visual Workflows
Build publishing workflows using n8n's intuitive drag-and-drop interface
🔄 Automation
Trigger posts based on schedules, webhooks, or other n8n nodes
📱 Multi-Platform
Publish to all 8 supported platforms from a single workflow
🔧 No Coding
Set up complex publishing logic without writing any code
Installation
Install the PostPulse node in your n8n instance.
Official n8n Node
Search for PostPulse
In your n8n workflow editor, click the + button to add a new node and search for "postpulse"
Add PostPulse Node
Select the official PostPulse node from the list and add it to your workflow
Alternative: NPM Installation
For self-hosted instances, you can also install via npm:
npm install @postpulse/n8n-nodes-postpulse
Credentials Setup
Configure your PostPulse credentials in n8n to authenticate with the API.
Step 1: Create OAuth Application
Open the Apps page
Go to PostPulse Developer Portal and sign in using the email associated with your PostPulse account
Create New Application
Click Create Application and provide a name (e.g., "My n8n Integration")
Get OAuth Credentials
After creating your application, you'll receive:
- Client ID: Your unique application identifier
- Client Secret: Your application's secret key (keep it safe!)
Step 2: Configure n8n Credentials
Add New Credential
In n8n, go to Credentials and click Add Credential
Select PostPulse
Search for and select "PostPulse OAuth2 API" from the credentials list
Enter OAuth Credentials
Fill in the credentials from your OAuth app at PostPulse Developer Portal:
- Client ID: Copy from your OAuth app
- Client Secret: Copy from your OAuth app
- OAuth Redirect URL: Copy this from n8n and add it to your application's callback URLs in PostPulse Developer Portal
Connect Your Account
Click the "Connect my account" button in n8n. This will:
- Open the PostPulse authorization page
- Use the same email address you used for your PostPulse account
- Authorize n8n to access your PostPulse account
- Automatically handle token refresh (OAuth2)
Available Operations
The PostPulse n8n node provides several operations for managing your social media publishing workflow.
Accounts: Get Many
Retrieve all connected social media accounts from your PostPulse account.
Use Case:
Get account IDs needed for publishing posts
Returns:
Array of account objects with IDs, platforms, and usernames
Accounts: Get Connected Chats
For Telegram, Facebook and Pinterest accounts, retrieve available channels/pages/boards where you can publish.
Parameters:
- Account ID: From Accounts - Get Many
- Platform: From Accounts - Get Many
Returns:
Array of available Telegram channels / Facebook pages / Pinterest boards with IDs and titles
Media: Upload
Upload media files to PostPulse before publishing. Two upload methods available:
From File (Binary Upload):
- Input: Binary file data from previous node
- Returns:
{ path }- Use this directly in attachment paths
From Public URL (Import):
- Input: Public URL of media file
- Returns:
{ id, state }- Use theidwith "Get Upload Status" - Note: Monitor import progress until state is "READY", then use the
s3Keyvalue in attachment paths
Media: Get Upload Status
Monitor the progress of URL-based media imports.
Parameters:
- Import ID: The
idreturned from "From Public URL" upload
Returns:
Complete import status including state, s3Key, bytesDownloaded, totalBytes, and error details if failed
States:
QUEUED → DOWNLOADING → VALIDATING → UPLOADING → READY (or FAILED)
Posts: Schedule (Light)
⭐ RecommendedSimplified interface for scheduling a single post to one account.
Key Features:
- Platform-specific fields: UI automatically shows relevant fields based on selected platform
- Auto platform settings: No need to manually construct JSON
- Smart dropdowns: Facebook Pages, Telegram Channels and Pinterest boards loaded automatically
- Simple media paths: Enter comma-separated paths from Media Upload
Perfect For:
Simple workflows, testing, and single-account posting
Posts: Schedule
AdvancedFull control for complex, multi-account posting scenarios.
Parameters:
- Scheduled Time: When to publish (ISO 8601 format)
- Is Draft: Whether to save as draft (recommended: false)
- Publications: Array of publication configurations with manual platform settings
Use Cases:
Multi-account posting, complex platform settings, Telegram multi-channel posts
Returns:
Post schedule object with status and IDs
Video Tutorials
Watch our comprehensive video tutorial series on how to use PostPulse in n8n workflows.
PostPulse n8n Tutorial Series
Watch Full Playlist on YouTube →Topics Covered:
- ✅ Initial Handshake: OAuth & n8n Account Connection
- ✅ Text-Only Scheduling: Simple post workflows
- ✅ TikTok Pipeline: Handling File Binaries
- ✅ Scalable Uploads: Posting via Public URLs
- ✅ Facebook Pages: Chat-based Post Operations
- ✅ Webhooks: Real-time Status Updates
Workflow Examples
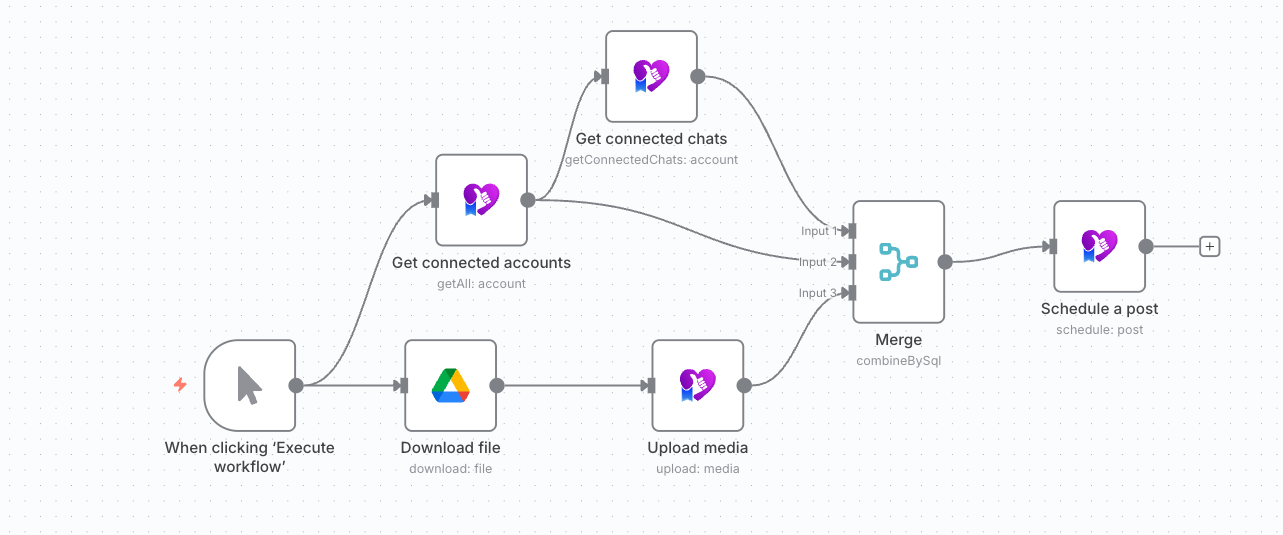
Real n8n workflow examples showing how to use PostPulse nodes to fetch accounts, get Telegram channels, upload media, and schedule posts.
Complete Publishing Workflow
This workflow demonstrates the complete process: fetching accounts, getting Telegram channel details, uploading an image, and scheduling a post.
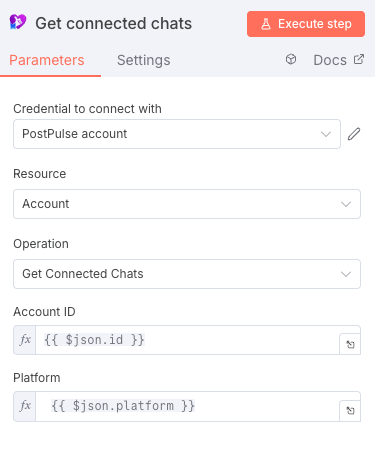
Get Connected Chats Step
This screenshot shows how to use fields from the "Get Accounts" operation to fetch available Telegram channels in the "Get Connected Chats" step.
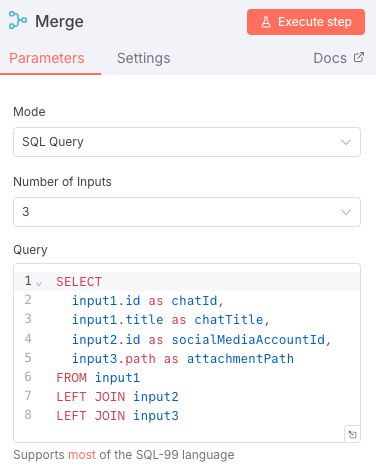
Merge Node Configuration
The merge node shows how to combine and rename fields from different steps to prepare data for the final post scheduling.
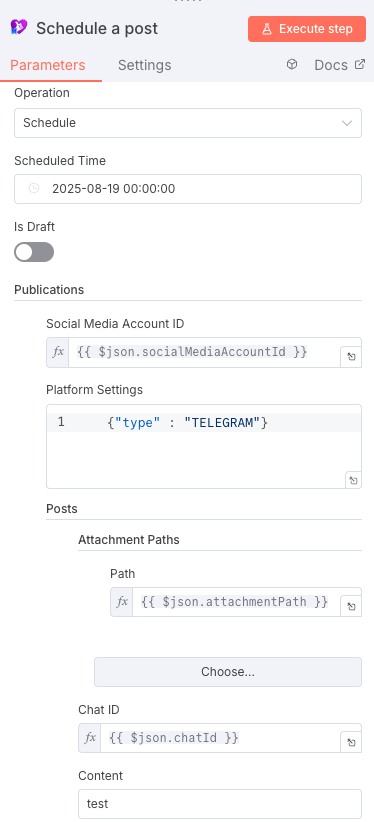
Schedule Post Configuration
This shows how fields from previous workflow steps are used in the final "Schedule Post" operation to publish content to social media platforms.
Troubleshooting
Common issues and solutions when using the PostPulse n8n node.
❌ Authentication Failed
Problem:
Getting authentication errors when using PostPulse operations
Solutions:
- Verify your OAuth client ID and secret are correct
- Ensure your PostPulse account email matches the credentials
- Check that your OAuth credentials are active
- Contact support if credentials were recently issued
📁 Media Upload Issues
Problem:
Media upload operation failing or returning errors
Solutions:
- Check file size limits for your target platforms
- Verify file format is supported by target platforms
- Ensure binary data is properly formatted in n8n
- Try uploading smaller files first to test
🚫 Post Scheduling Errors
Problem:
Posts failing to schedule or publish
Solutions:
- Verify account IDs are correct from Accounts Get Many
- Check platform settings match the target platform
- Ensure required fields are provided for each platform
- Validate media paths from upload operation
🔧 Node Not Available
Problem:
PostPulse node doesn't appear in n8n node list
Solutions:
- Ensure community nodes are enabled in n8n settings
- Verify the node was installed correctly
- Restart your n8n instance after installation
- Check n8n logs for installation errors
Need More Help?
If you're still experiencing issues, don't hesitate to reach out: