How to Schedule Posts on LinkedIn: Native and API Methods
Published on
Tags:
Why does a post you queued for 9 a.m. land at the wrong hour, or get rejected outright when the time looked perfectly valid? If you're learning how to schedule posts on LinkedIn, the composer isn't the hard part. The hard parts are the different windows for profiles and Pages, whose clock the schedule follows, and what you can still change once a post is queued. Get those three things right and scheduling gets boring, in a good way.
Table of Contents
LinkedIn Scheduling Windows for Profiles and Pages
Two windows decide whether LinkedIn accepts your timestamp, and they're not identical.
Personal profiles can schedule from 10 minutes ahead up to 3 months out, and your chosen time gets rounded to the nearest supported interval, according to LinkedIn's help page on scheduling posts. LinkedIn Pages start later, at 1 hour ahead, with the same 3 month ceiling. That one difference breaks a lot of assumptions when a team copies a profile workflow onto a Page.
LinkedIn Scheduling Limits by Account Type
Account type | Earliest time | Latest time | Time handling | Who can schedule |
Personal profile | 10 minutes from now | 3 months ahead | Rounded to the nearest supported interval | The member posting |
LinkedIn Page | 1 hour from now | 3 months ahead | Administrator's local time zone, exact time allowed | Super admins and content admins only |
Events, Jobs, Services | Not schedulable in the standard composer | Not applicable | Not applicable | Publish directly |
Permissions are the second gate. A member schedules their own profile posts, but Page scheduling is restricted to super admins and content admins. If the clock icon behaves unexpectedly on a Page, check your admin role before you blame the timestamp.
Format is the third gate. Events, Jobs and Services can't be scheduled through the standard post composer, so plan to publish those directly at the moment you want them live. Don't build a queue around a format the composer won't queue.
Treat the 3 month limit as a planning horizon, not storage. Content dated further out has to wait. Hold it in your own draft system, then schedule it once it falls inside the window.
Pre-check before you open the composer: confirm the account type, confirm admin rights if it's a Page, and confirm the target time sits inside that account's window.
How to Schedule a LinkedIn Post Step by Step
The visual below maps both click paths side by side, profile first and Page second.
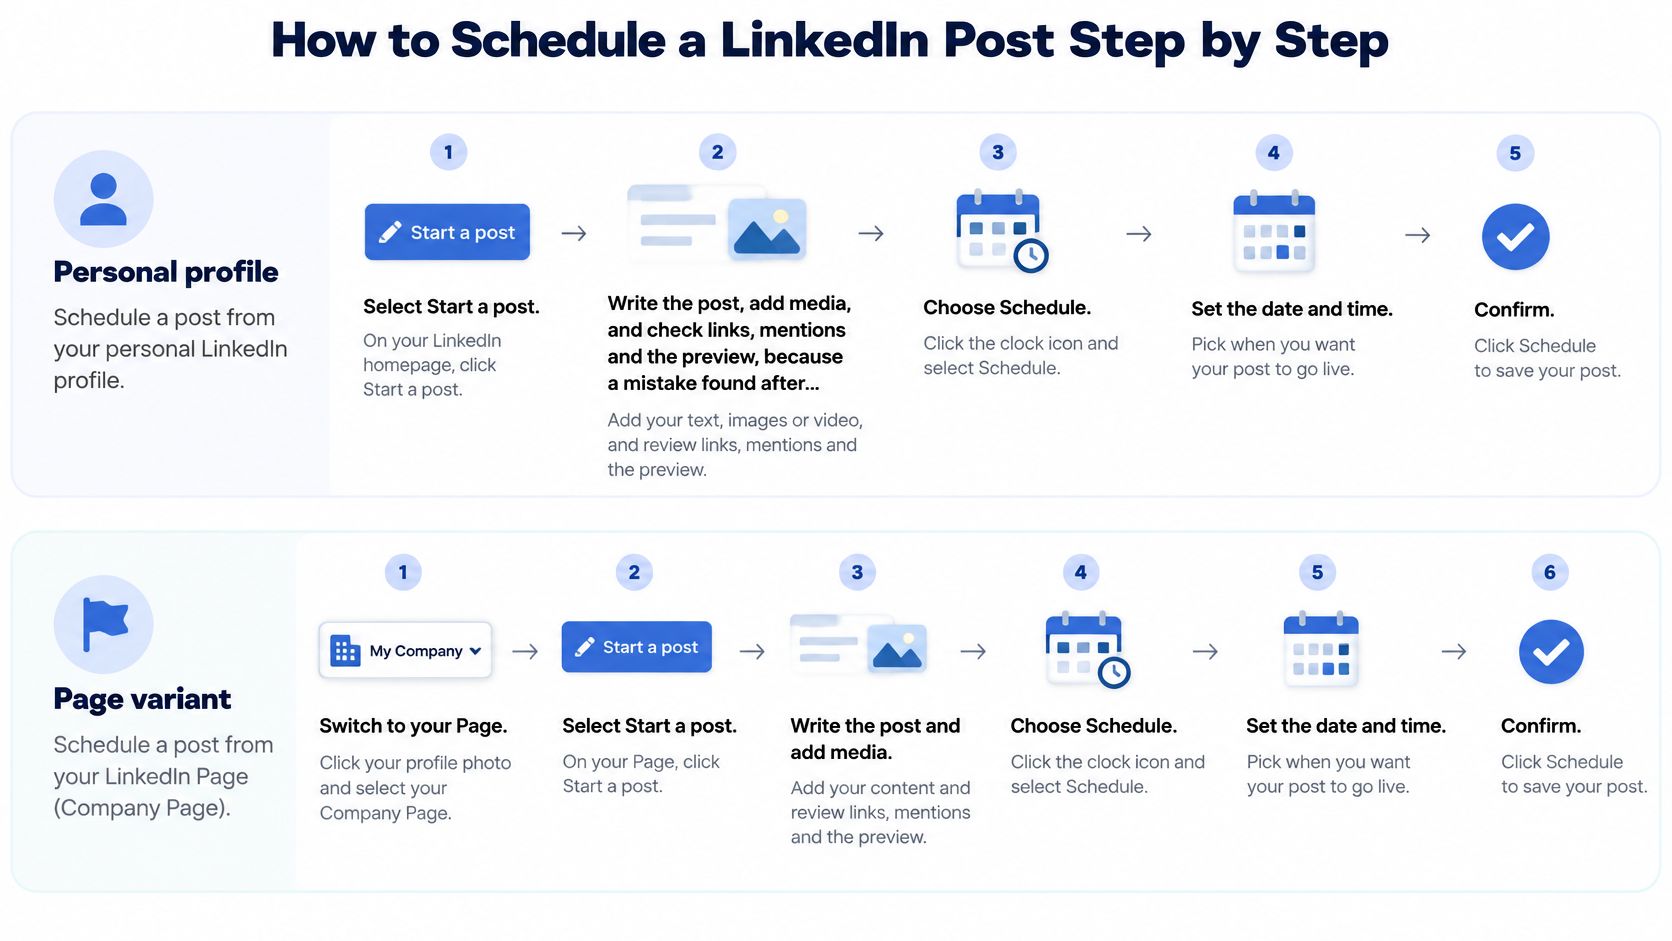 A step-by-step instructional infographic showing how to schedule LinkedIn posts for personal profiles and company pages.
Personal Profile
Select Start a post. This opens the standard composer.
Write the post and check everything. Add media, then verify links, mentions, audience visibility and the preview. A mistake you catch now is a fix. A mistake you catch after queuing is an edit.
Open the clock icon. It sits with the publishing controls.
Choose a date and time inside the profile window. LinkedIn permits scheduling from 10 minutes after the current time up to three months ahead, with the time rounded to the nearest supported interval, per LinkedIn's scheduling documentation.
Click Next and read the review screen. This is your last cheap chance to catch a wrong day or hour before the post goes live on its own.
Click Schedule. Then open the scheduled posts list and confirm the item is queued with the timestamp you intended.
The short walkthrough below shows the same flow on screen if you'd rather watch the clicks than read them.
LinkedIn Page
The Page path adds an admin step at the front. Open the Page's admin view, select Page posts, then click Start a post. Create and preview the content, select the scheduling icon, and choose an exact date and time at least one hour ahead. Click Next, finish the review, and click Schedule.
The common slip on both paths is picking a time too close to now. The control won't accept it, and the error rarely explains itself well. If scheduling refuses your timestamp, move it further out before you suspect anything else.
Batching works well here. Prepare several posts in one sitting, schedule each only after its preview check, and keep a short review pass for posts approaching publication. You're online for the comments anyway, so queue publication and reserve your attention for replies.
Edit, Reschedule and Delete Queued Posts
A queued Page post isn't locked. Scheduled LinkedIn Page posts stay editable after creation, so you don't have to delete and rebuild an item every time a launch date slips, as LinkedIn's Page scheduling documentation describes.
From the scheduled posts list, an admin gets four distinct actions.
Post now: publish immediately instead of waiting for the slot.
Edit the post: change the content while it stays queued.
Modify schedule: open the post's More menu, choose Modify schedule, and pick a new date and time.
Delete: remove the scheduled post entirely.
Model these as separate states, not side effects. Editing copy shouldn't automatically move a time, and rescheduling shouldn't be treated as deleting and recreating. If you're building an internal workflow or approval sheet on top of LinkedIn, give each action its own explicit step and owner. That's what keeps two admins from fixing the same post in opposite directions.
Only super admins and content admins can make these changes on a Page. For a personal profile, work from the scheduled list in your own account, and don't assume the menu matches the Page menu item for item. If you can't locate the queue itself, our guide to finding scheduled posts on LinkedIn walks through where the list lives.
Governance is simple but easy to skip. Audit the queue before any major launch. Move posts hit by breaking news, an outage or a campaign change, and delete anything that's no longer true or relevant.
Pre-launch checklist you can copy: for each queued post, confirm the time, the account, the final content, and the owner who'll handle replies after it publishes.
Time Zones, Recurrence and Posts That Drift
Here's the assumption worth dropping. A scheduled time does not mean the same clock for everyone involved.
Page scheduling uses the administrator's local time zone, and LinkedIn allows an exact time rather than only the displayed 30 minute choices, according to LinkedIn's Page scheduling help page. So an admin in one city planning a launch for an audience in another can publish an hour off without anything looking wrong on screen.
A Conversion Routine That Prevents Drift
Write the intended zone next to every campaign time. A bare 09:00 is not a time. It's a label waiting to be misread.
Convert each time to UTC. UTC is the canonical zone we store scheduled times in at PostPulse, and it's the safest single reference for any multi-region team.
Check the resolved local timestamp before confirming. Read back what the system will do, in the zone of the person publishing.
Keep one list with two columns, UTC and local. When someone questions a slot, both answers are on the same row.
Say a launch is set for 09:00 in Berlin on a clock change weekend. The UTC instant you stored stays fixed. The local label people see in other zones shifts around it. Teams that planned in local labels argue about which 09:00 was meant. Teams that planned in UTC just read the column.
Recurrence is the other quiet gap. The LinkedIn help pages describe one-off scheduling and don't document a recurring option. A weekly series means one scheduled item per post, created by hand, or an automation tool that creates each slot for you. Don't promise a stakeholder a repeating native schedule that doesn't exist.
Write the zone, then the time, then convert. In that order, every time.
Choose a Route and Schedule Through the API
Which route fits the work: LinkedIn's native scheduler for manual posts, or an API or no-code workflow for repeatable publishing? If you're comparing third-party options, Grou's directory of LinkedIn content scheduling tools lists options alongside the routes below.
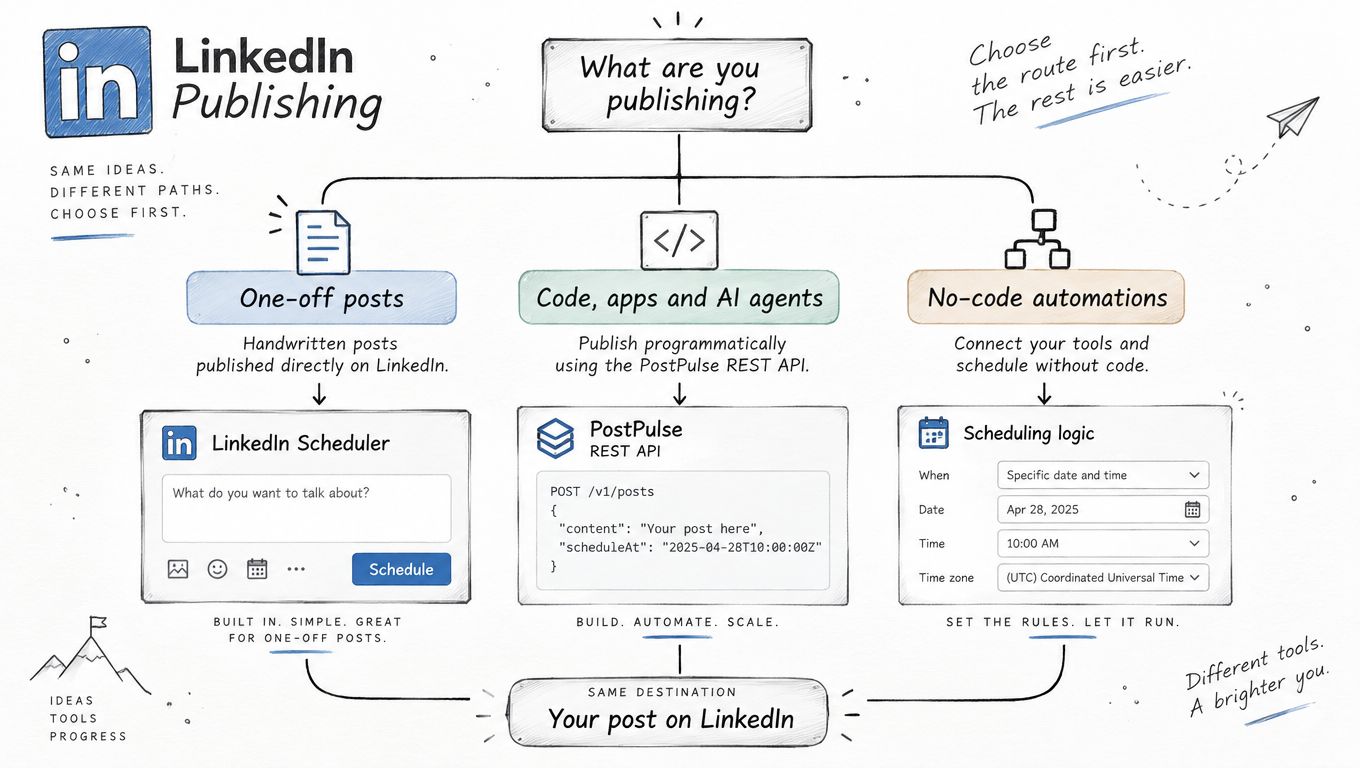 An infographic showing three ways to publish LinkedIn content: one-off posts, API-based automation, and no-code tools.
Scheduling Routes Compared
Criteria | Native LinkedIn | PostPulse API | n8n or Make.com |
Best for | One-off posts made by hand | Apps, AI agents and internal tools | No-code automations |
Setup | Your LinkedIn account only | Account, API keys and one test request | Official n8n node or Make.com app |
Platforms | LinkedIn only | 10 platforms from one integration | Same 10 platforms through PostPulse |
Time zone handling | Administrator's local zone for Pages | Scheduled times are stored in UTC | Set the scheduled time in UTC |
Status visibility | Scheduled posts list | Per-account status in post details | Workflow run history plus post details |
The API Route Step by Step
Create your account and generate API keys. Keep the keys out of client-side code.
Authenticate and fetch accounts. To test an integration, authenticate with your client ID and secret, fetch connected accounts, and upload media if needed.
Send a test post. The
POST /v1/postsrequest acceptsscheduledTimeand anisDraftflag. SetisDrafttofalseto schedule the post, ortrueto save it as a draft while you validate the payload.Send
scheduledTimein UTC. PostPulse stores scheduled times in UTC, so use UTC when setting the schedule.Check the returned status and LinkedIn's scheduling window before sending more requests in a batch.
The no-code route uses PostPulse's official n8n node or Make.com app. Set the content, account and scheduled time as workflow fields instead of writing HTTP calls. Validation still matters: a workflow can send an incorrect time or payload just as an API request can.
Check any endpoint name, field, status value or time zone behaviour against the LinkedIn API guide for developers before relying on it. LinkedIn rules and vendor-specific API behaviour are separate concerns, so confirm each against the relevant documentation.
For a first integration test, create an account, generate API keys, fetch connected accounts, upload media if required, then schedule a test post. A single POST can send content to every connected account; post details show each account's status and the platform post ID and public link, or an error message if publishing failed.
Troubleshooting Scheduled Posts That Fail
Most scheduling failures are boring, which is good news. Boring means diagnosable.
The rejected timestamp comes first because it's the most common. The composer refuses anything outside the account window, too soon or too far out. The wrong hour comes second, and it's almost always a time zone mix-up between your zone and the Page administrator's local zone.
Scheduling Symptoms, Causes and Fixes
Symptom | Likely cause | Fix |
Schedule control rejects the time | Time is outside the account window, under 10 minutes or over 3 months for a profile, under 1 hour or over 3 months for a Page | Pick a time inside the window for that account type |
Page post goes out at the wrong hour | Your time zone was mixed with the administrator's local time zone | Convert from UTC and check the resolved local timestamp before confirming |
One account shows a failed status | A per-account publishing error | Read the account's error message in post details, fix the cause, then reschedule |
Events, Jobs or Services will not schedule | These formats cannot be scheduled in the standard composer | Publish the post directly at the moment you want it live |
Deleted post is still visible | Posts already published stay on the platform when deleted from PostPulse | Delete the live post on LinkedIn itself |
For API failures, resist the urge to blind retry. Our post details show a status for each connected account, with the platform's post ID and public link on success, or the error message if publishing failed. Read that message first. It usually names the actual problem, and resending an unfixed request just fails twice. If you want failures pushed to your own systems instead of polled, our LinkedIn webhook notifications can call your endpoint on success or failure.
The deleted-but-visible case surprises people. A post deleted in PostPulse can remain live on LinkedIn, because deleting our record doesn't retract content the platform already published. Remove it on LinkedIn itself.
Record each post's ID and scheduled time when you queue a batch, so you can trace any item later.
Check post details the morning after a batch runs, while a fix still matters.
Recheck the account window before retrying, since a slot that was valid yesterday can be too close today.
Fix the cause before you reschedule. Resubmitting the same request unchanged is how one failure becomes a pattern.
Test Whether a Posting Window Helps
Scheduling reliably is an engineering problem. Scheduling at a time that helps is an experiment, and many skip running it.
Treat every recommended posting window as a hypothesis, not a guarantee. LinkedIn's documentation doesn't establish a universal engagement uplift for any slot. Even solid market benchmarks, such as Socialinsider's reported average engagement rate of 5.00% by impressions in 2025 from its analysis shared via Socialinsider's LinkedIn post, describe the market. They don't describe your account.
A Test You Can Actually Run
Hold the content variables steady. Keep topic, format, audience and call to action stable across the test, so timing is the thing changing.
Rotate publication windows over several weeks. Each window needs enough posts to average out one unusually good or bad day.
Compare the same metrics per window. Use impressions, engagement rate, profile or Page visits, and qualified conversions if you can track them.
Split results by audience region. Separate the audience's local time zone from your own instead of hunting for one global best time that pleases nobody.
Set a review date in advance. Record each post's UTC time and local label, so every result traces back to an exact slot.
I'd also add safeguards the moment automation enters the picture. Require human approval for sensitive posts, define pause rules during a crisis, run duplicate-content checks, and keep post-publication monitoring on. An autonomous scheduler that publishes successfully into the wrong news cycle has still failed you.
That's the honest framing for how to schedule posts on LinkedIn well. Scheduling is a consistency and workflow tool first. Any reach benefit from timing is something you prove on your own numbers, one controlled rotation at a time.
If you're scheduling LinkedIn posts from code, an AI agent or a no-code workflow, PostPulse gives you one REST API, plus official n8n and Make.com integrations, to queue posts with a UTC scheduledTime and read per-account status back. Create an account, generate your API keys, and send one test post through the same window checks covered above.
About the Author

Founder of PostPulse — a social media scheduling platform for creators and teams. Software engineer with a passion for building developer tools and simplifying complex API integrations across social media platforms.