How to Upload Videos to Twitter: Limits & API Tips
Published on
Tags:
You upload a video that played perfectly in your editor, stays below the visible time limit, and still gets rejected by Twitter, now X. The frustrating part is that the composer often tells you almost nothing. A file can fail because of account entitlement, device surface, container, codec, bitrate, or unfinished server-side processing.
The practical answer to how to upload videos to Twitter starts before you click Post. Validate the account tier, export to a compatible format, keep the file inside the applicable limits, and use X's chunked API flow when you're automating uploads. The details matter more than the button.
Table of Contents
Why Your Video Upload to Twitter Keeps Failing
A 90-second clip can succeed repeatedly and then fail after a harmless-looking export change. The duration still fits the standard account limit, but the encoder may have raised the bitrate, changed the audio stream, or produced a container that X's processor handles poorly. The error may say that media processing failed.
The first diagnostic question is which account and surface are receiving the file. X's help documentation sets the standard baseline at 140 seconds and 512 MB for non-Premium accounts in its Premium long-video guidance. Premium access expands the upload envelope, but the allowance also depends on where you upload. X documents support for videos up to 4 hours on web and iOS, while Android supports up to 10 minutes for Premium uploads, as summarized in this neutral overview of Twitter video limits.
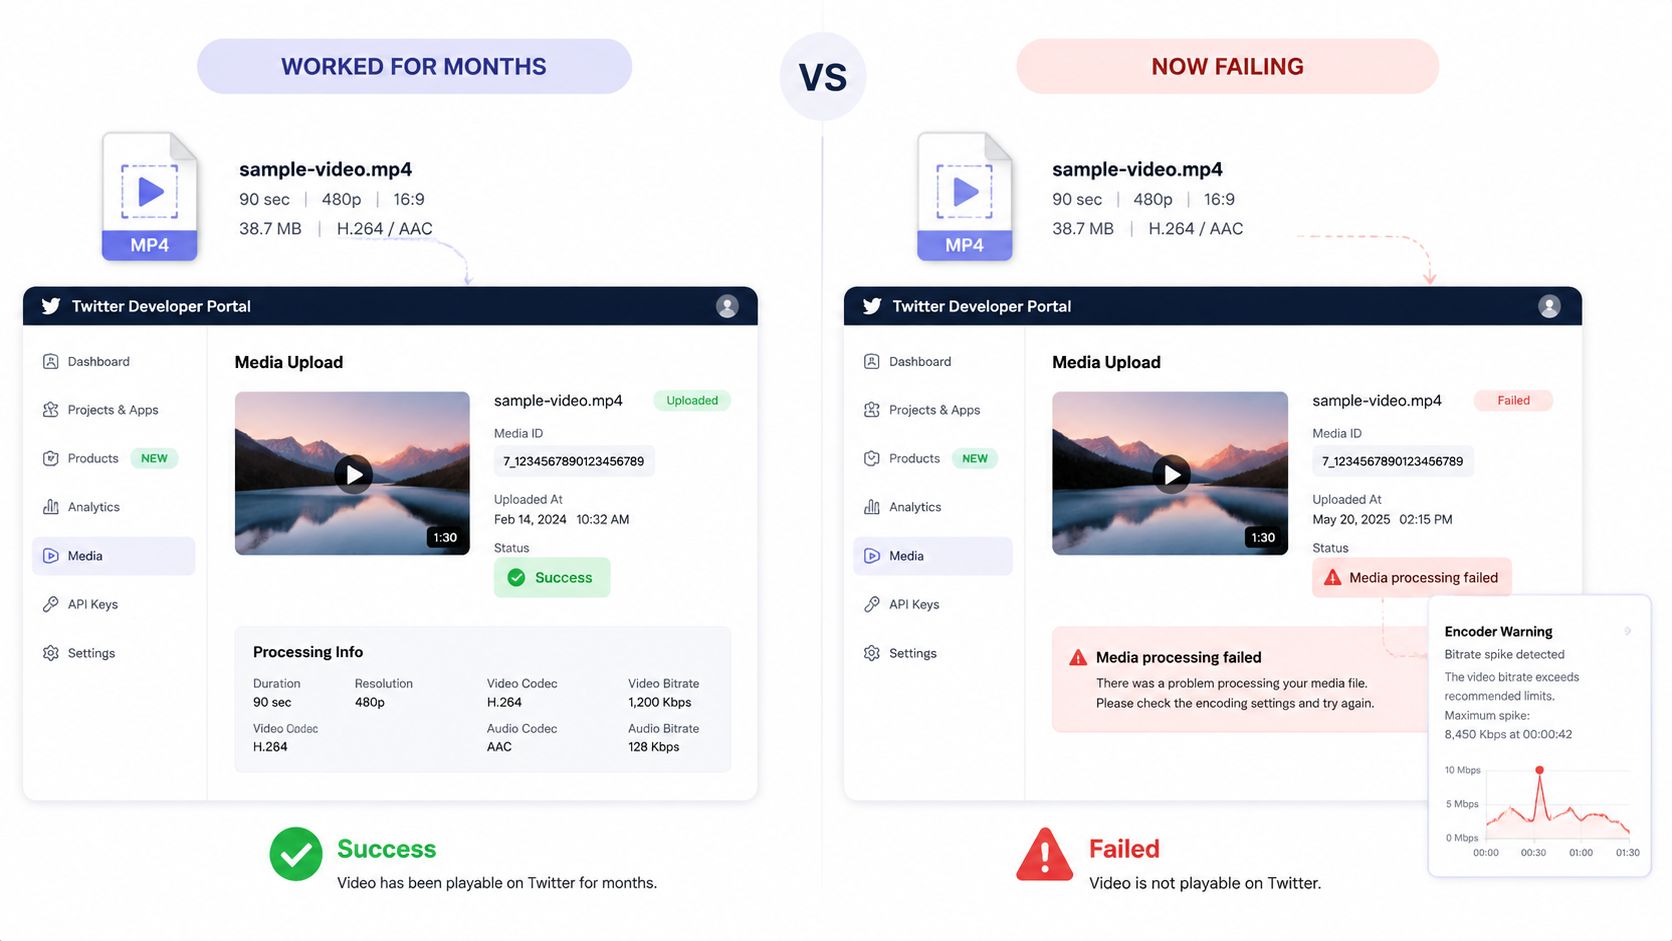 A comparison infographic showing successful Twitter video uploads versus recent failures due to bitrate spikes.
Practical rule: Validate entitlement before debugging the file. A Premium-length video sent through a standard account will fail even if the codec is perfect.
There's also a historical reason developers sometimes misread expectations. Reuters reported that Twitter expanded native video uploads from an earlier 30-second cap to 140 seconds in June 2016 in its coverage of the change. The platform became more capable, but it didn't become permissive in every workflow.
For automated publishing, the UI is the least useful place to reason about failures. The API requires a separate chunked lifecycle for video, and processing can continue after the upload request completes. Treat duration, file size, encoding, account tier, device, and processing state as separate checks.
Uploading Videos on Mobile, Web, and X Studio
The mobile composer is the fastest route for a short clip. Open the X app, tap the media icon in the compose sheet, choose a video from the gallery or record one, adjust the trim handles, and publish. The app may re-encode aggressively, so a file that worked from a desktop browser can behave differently after mobile processing.
On Android, don't assume Premium gives you the same long-video window available elsewhere. X's documented Premium limits distinguish web and iOS uploads from Android, where the supported duration is much shorter. For a long recording, route the upload through x.com or iOS instead of repeatedly retrying it in the Android app.
The browser composer follows a familiar path. Open the post box, select the media icon, browse for the file or drag it into the composer, and wait while X processes the upload before publishing. This is convenient for one-off posts, but browser-side handling can expose compatibility issues that aren't obvious from the filename.
Choosing X Studio for managed publishing
X Studio can be useful when a team needs drafts, scheduling, or a more deliberate publishing workflow. Select Video when creating a new post, add the prepared asset, and allow processing to finish before scheduling or publishing. Access and available functions can depend on the account configuration, so confirm that the account is enabled for the Studio workflow before building a process around it.
An iPhone export can also create a web problem if it uses a format the browser path doesn't accept cleanly. Re-exporting to MP4 with H.264 video and AAC audio is usually more reliable than repeatedly uploading the original camera file. For a managed workflow, the PostPulse media upload documentation is a useful reference for separating asset preparation from publishing.
Twitter Video File Specs, Codecs, and Bitrate
A file can meet the duration limit and still fail during processing. Start with MP4 or MOV, H.264 video, and AAC audio. X's official guidance supports frame rates up to 60 FPS and lists practical resolutions such as 1280×720, 720×1280, and 720×720 in its Media Studio FAQ.
The codec choice matters more than the filename. H.264 with AAC, preferably AAC LC, gives the web, mobile, and API paths a format they commonly process. Camera originals using ProRes, VP9, AV1, PCM audio, or unusual stream settings may open correctly on a desktop while failing after upload.
X's API guidance specifies a minimum video bitrate of 5,000 kbps and a minimum audio bitrate of 128 kbps. Treat those as floor values, not an instruction to maximize bitrate. A higher bitrate consumes the file-size allowance faster, especially when one source must serve several platforms. The YouTube upload guide for creators helps compare export decisions, but validate the final file for X rather than assuming a YouTube-ready encode will pass unchanged.
X video upload specs at a glance
Spec | Standard Tier | Premium Tier |
Maximum duration | 140 seconds | Up to 4 hours on web and iOS, up to 10 minutes on Android |
Maximum file size | 512 MB | Up to 16 GB for videos above 2 hours and under 4 hours on web and iOS |
Container | MP4 or MOV | MP4 or MOV |
Audio | AAC, preferably AAC LC | AAC, preferably AAC LC |
Frame rate | Up to 60 FPS | Up to 60 FPS |
Common resolutions | 1280×720, 720×1280, 720×720 | 1080p is supported for Premium on web and iOS, with longer uploads subject to documented constraints |
The account and upload surface determine which row applies. Standard accounts pair the 512 MB ceiling with the 140-second limit. Premium web and iOS uploads have a wider window, while Android has a shorter duration allowance. X's specifications also state that videos under 2 hours at 1080p should stay below 8 GB, while videos over 2 hours and under 3 hours must use 720p and remain under 8 GB.
Inspect the actual streams before uploading, not only the extension. PostPulse's media checker can handle that validation step when repeated manual checks would slow a publishing workflow.
Common Upload Errors and How to Fix Them
Most failures have a recognizable shape once you separate the visible message from the underlying cause. “Under the time limit” only rules out one category. It doesn't prove that the container, audio stream, account tier, or processing state is acceptable.
Error Message | Root Cause | Fix |
Processing failed | Unsupported or poorly handled codec, stream, or container | Re-encode video as H.264 and audio as AAC, then retry |
File too large | The asset exceeds the standard account's 512 MB allowance | Trim the edit, reduce resolution, or lower bitrate while preserving the documented minimum |
Media not yet ready | The API accepted the upload but processing hasn't finished | Poll the media status until processing succeeds |
Video too long | The file exceeds the account or surface entitlement | Use a shorter export or upload through an eligible Premium surface |
Format not supported | The extension hides an incompatible stream, such as PCM audio in a MOV | Remux or re-encode with AAC audio |
When processing fails
ProRes, VP9, and AV1 are common sources of trouble in cross-platform pipelines, even when the file opens locally. A dependable remediation is to use HandBrake or FFmpeg and explicitly set H.264 video plus AAC audio. For example, a controlled export can use -c:v libx264 -profile:v high -c:a aac, then you can inspect the output before uploading.
When the API appears stuck
The chunked endpoint can report that media is queued rather than ready. That isn't necessarily a failed upload. The application needs to request status again and respect the delay returned by X instead of immediately finalizing the tweet or treating the first non-ready response as permanent failure.
When the account tier is wrong
A long file may work from an eligible Premium web session but fail through a standard account or a surface with a shorter allowance. Log the account tier and upload surface alongside the file metadata. That single piece of context often explains a “works on desktop, fails on mobile” report faster than another round of codec experiments.
Optimization Tips Before You Hit Publish
A reliable publishing pipeline treats every video as an asset that needs a pre-flight check. Inspect the container, video codec, audio codec, bitrate, frame rate, dimensions, and duration with FFmpeg or another media inspector before the upload request leaves your server.
For a conventional 1080p source, a practical preset is H.264 High with AAC-LC audio and a stable frame rate. A CRF around 23 can be a reasonable starting point for quality-based encoding, but the resulting file still needs inspection because CRF doesn't guarantee a fixed size or bitrate.
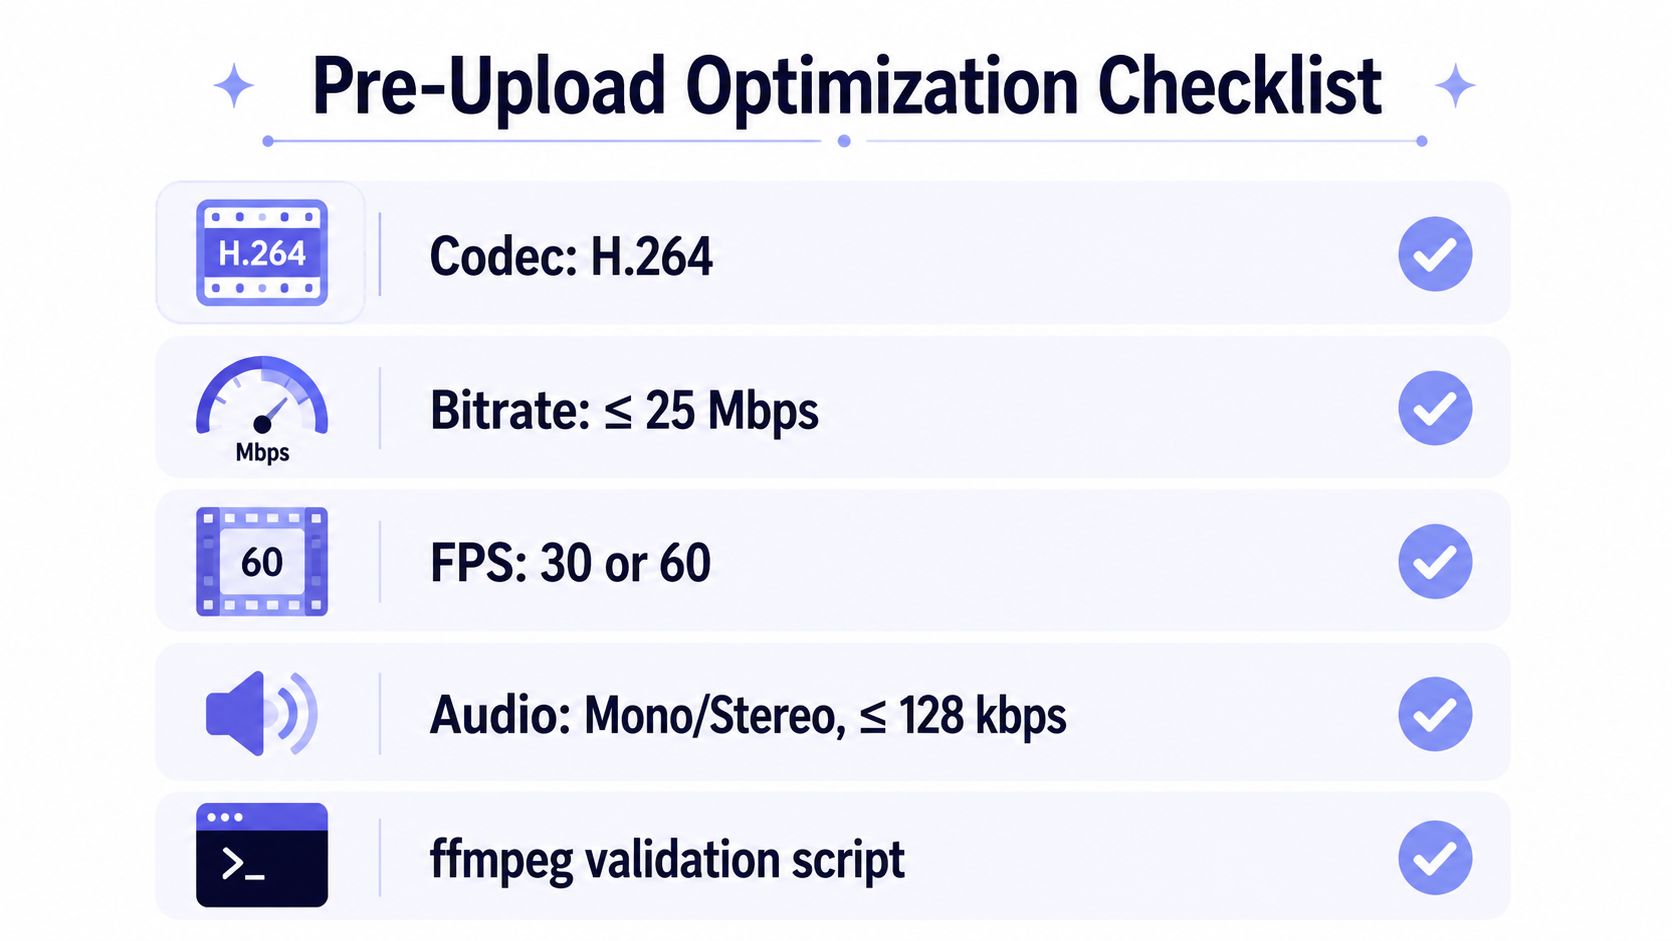 A checklist for optimizing video files before uploading, displaying recommended settings for codec, bitrate, fps, and audio.
Build margin into the export
Don't aim for the absolute file-size boundary when you control the source. Leaving headroom gives your workflow more tolerance for metadata changes, packaging differences, and server-side processing. Strip unnecessary EXIF metadata if your pipeline carries camera data that X doesn't need.
Thumbnail selection also deserves deliberate handling. Choose a strong frame manually in the composer when possible, or use the upload options supported by your integration rather than accepting an arbitrary first frame. A clear opening frame makes the post understandable before playback begins.
Encoding advice: A compliant file is more valuable than a technically pristine master. Keep the master separately, then create a platform-specific delivery export.
Captions should remain readable without sound, but avoid baking every subtitle decision into the image when your publishing workflow supports a separate caption track. For audio cleanup before export, tools focused on AI tools for video audio can help prepare a cleaner source without changing the X upload process itself.
PostPulse can apply media checks server-side and normalize assets before distribution, which is useful when one source file needs different treatment for X and other destinations. The engineering advantage is consistency: validation happens before the platform request, not after a failed post has already entered the queue.
Uploading Videos to X Programmatically via the API
Video automation uses X's chunked media upload flow, not the simple image-oriented upload path. X's API introduction distinguishes the simple upload route for images from the recommended chunked route for images, GIFs, and video, while the chunked upload quickstart defines the video lifecycle.
The flow has four phases:
INIT creates the upload session and returns a
media_id.APPEND sends the binary file in sequential chunks.
FINALIZE tells X that all chunks have arrived and starts processing.
STATUS checks whether processing has completed.
The documentation's concrete example splits a 3 MB file into three 1 MB chunks, with one APPEND request for each chunk, as shown in the APPEND API reference. Your application should preserve the same ordering discipline even when the file and chunk sizes differ.
The request shape
Conceptually, INIT includes the total byte count, media type, and media_category=tweet_video:
POST media/upload, command=INIT, total_bytes=..., media_type=video/mp4, media_category=tweet_video
APPEND then sends each binary segment with the returned media_id and a sequential segment_index. FINALIZE uses that same identifier. Every request needs the authentication scheme required by your X application, and write access must be configured correctly before testing the upload loop.
After FINALIZE, inspect the processing response. If X reports that the media is still queued, call STATUS again after the provided processing delay. A production worker should handle retries, transient server responses, incomplete sessions, and cleanup rather than assuming FINALIZE means the video is immediately publishable.
Once processing succeeds, attach the media_id to the tweet creation request. Keep the upload and tweet creation close together because media identifiers are temporary and can expire before they're used.
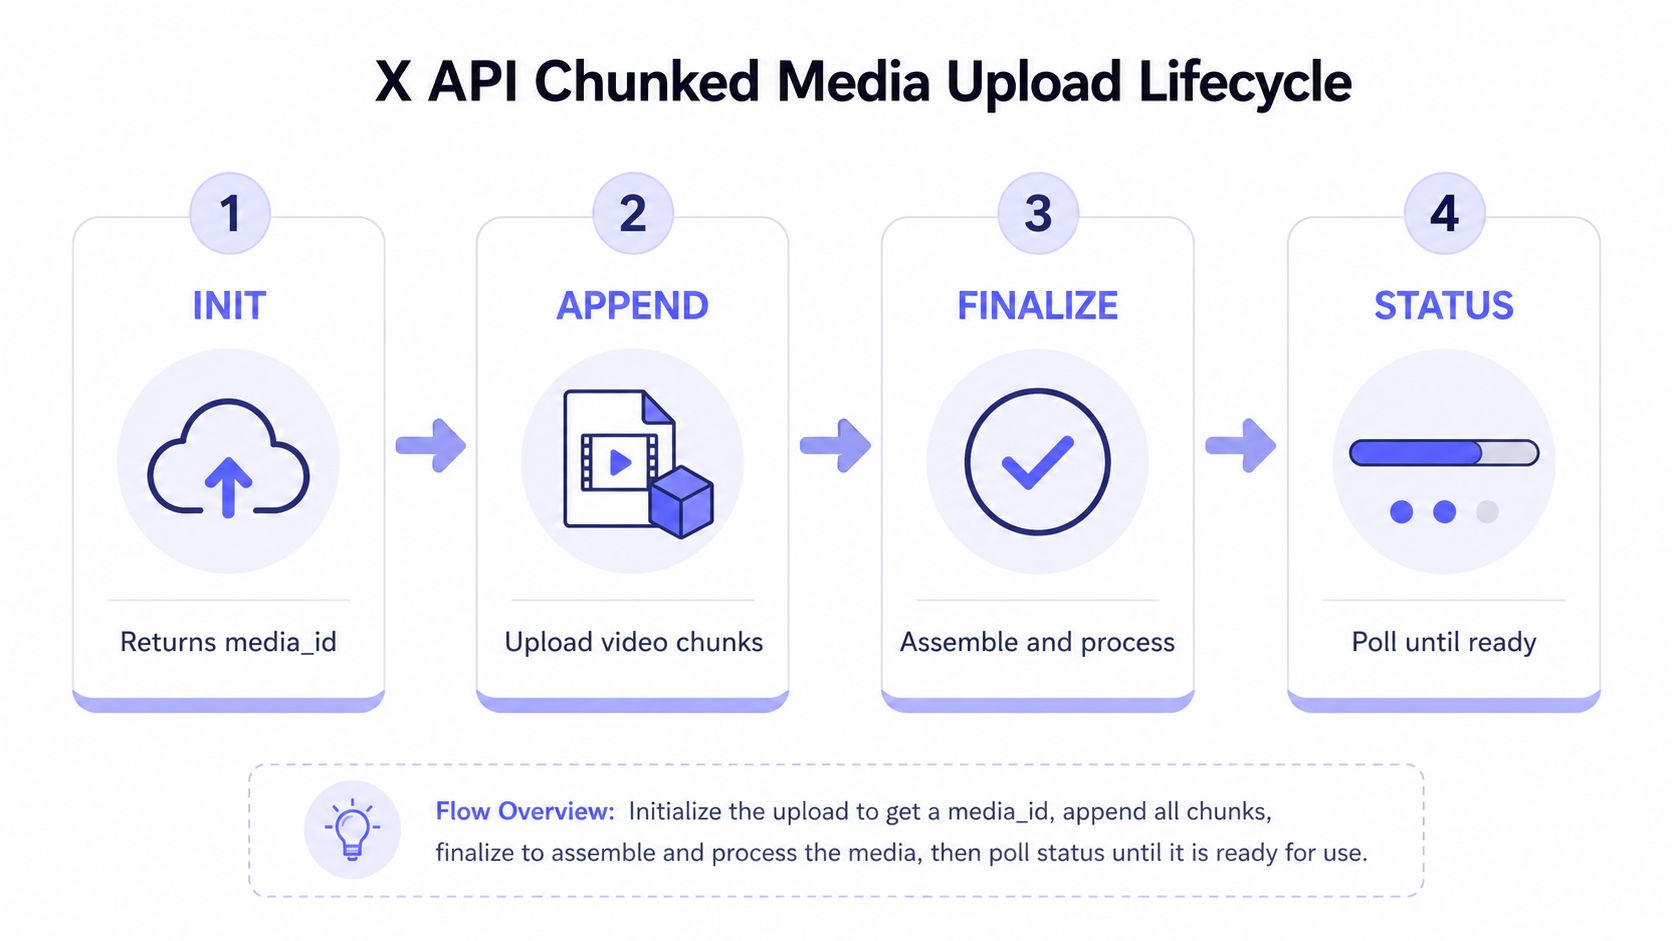 A diagram outlining the four-step X API chunked media upload lifecycle from initiation to status.
Rate-limit headers should feed your queue design. Don't launch unbounded parallel uploads because a retry storm can make a media problem look like an authentication problem. If you'd rather not maintain the INIT, APPEND, FINALIZE, and STATUS loop yourself, the PostPulse guide to X chunked media uploads provides a middleware-oriented approach.
Publishing to X and 8 Other Platforms via PostPulse
Cross-platform publishing becomes difficult when each destination expects a different upload sequence. A useful abstraction is a publish request containing the media asset, caption, target accounts, and an optional scheduled_publish_at value. The service handles the platform-specific media preparation, then returns the post URL and per-platform status so the caller can distinguish a successful X publication from a failure elsewhere.
With PostPulse, the same distribution model can be used through several integration paths. A REST request can carry a video file or URL, the caption, the X account mapping, and an optional schedule. An n8n workflow uses the official PostPulse node: authenticate with the API key, choose Create Post, attach the asset, map the X account, and pass the caption field.
The Make.com equivalent is an app module configured for video creation and publication. In an AI workflow, an MCP server exposes a publishing tool that accepts the same core payload, allowing Cursor or Claude to call call_publish_video without implementing each platform's upload protocol inside the agent.
One asset, multiple delivery rules
The value of this pattern isn't pretending that every platform has identical constraints. It's keeping those constraints out of every individual product integration. The service can route, validate, and upload the asset separately for X, LinkedIn, TikTok, YouTube, Facebook, Instagram, Pinterest, Threads, and Bluesky, while the application maintains one publishing interface.
For example, a 90-second product demo can be submitted once with a shared caption and nine mapped destination accounts. The response can report the X URL, the status for each other platform, and any platform-specific rejection without forcing the product team to rebuild the X chunked-upload state machine.
Architecture choice: Keep your application responsible for content and intent. Put OAuth handling, refresh logic, media chunking, and platform-specific retries behind the publishing layer.
Teams planning a launch can pair the technical distribution flow with this guide on how to launch your product on X, especially when the video is one element of a broader announcement sequence. The important implementation detail remains the same: normalize the media before dispatch, then track results per destination instead of treating “published” as one universal state.
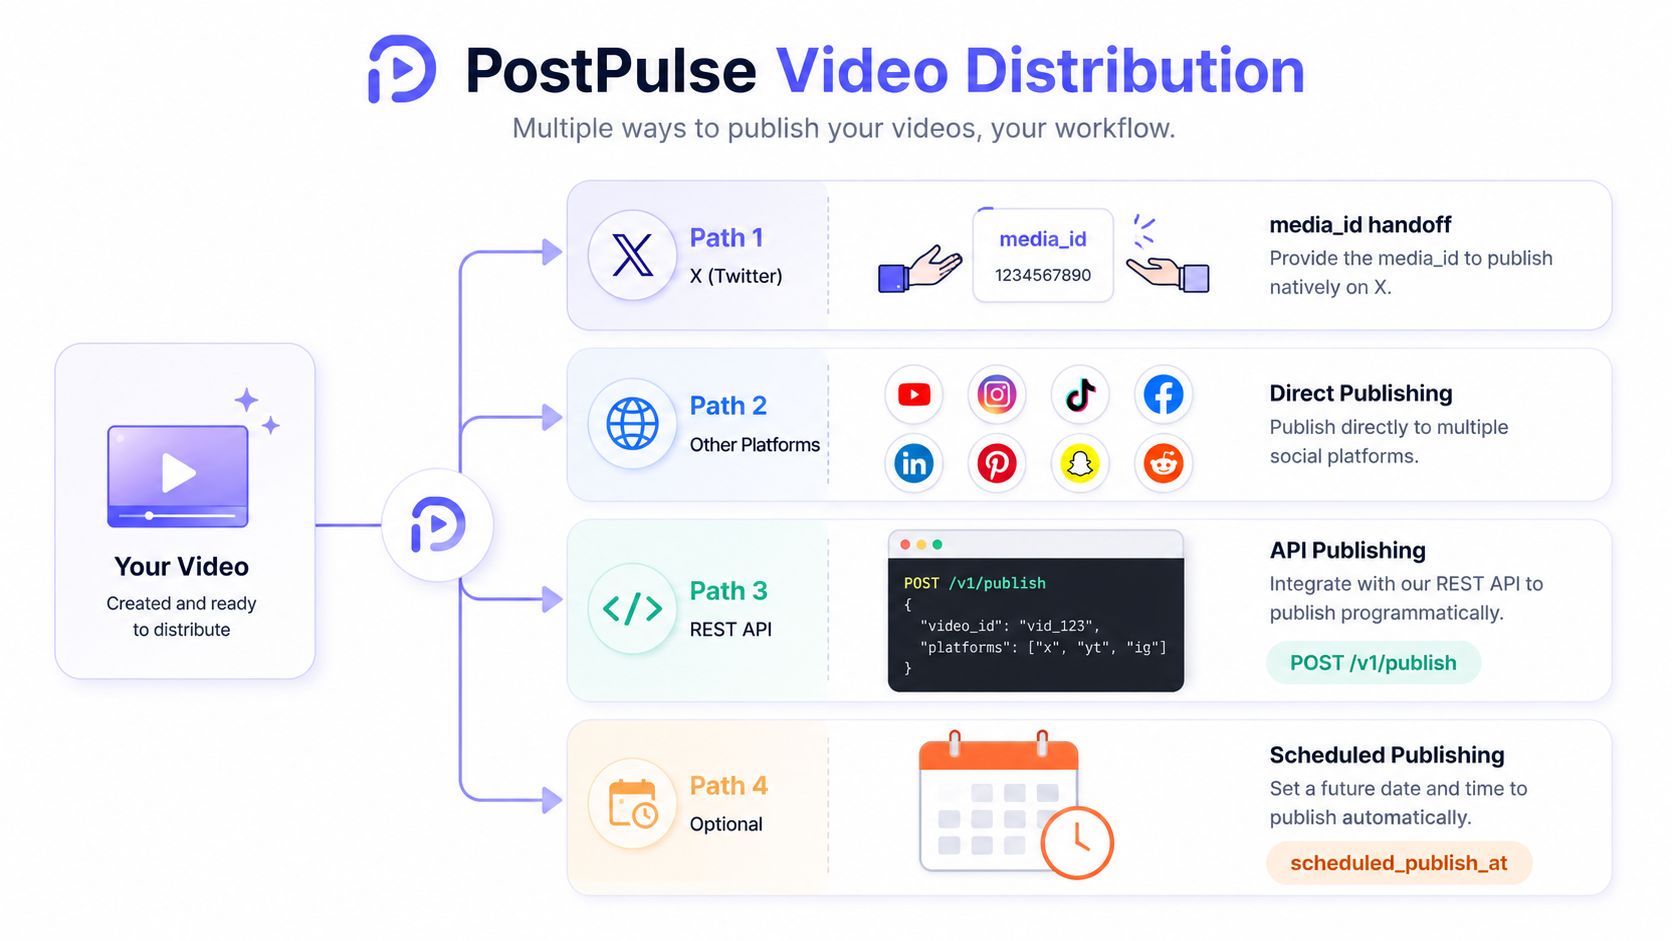 A diagram illustrating PostPulse video distribution options including Twitter, direct publishing, REST API, and scheduled publishing workflows.
PostPulse gives developers a unified way to upload and publish video to X and eight other platforms through a REST API, n8n, Make.com, or an MCP server. If you want to stop maintaining account-tier checks, media normalization, OAuth flows, and chunked uploads yourself, visit PostPulse and connect your publishing workflow.
About the Author

Founder of PostPulse — a social media scheduling platform for creators and teams. Software engineer with a passion for building developer tools and simplifying complex API integrations across social media platforms.